ShopDreamUp AI ArtDreamUp


Suggested Deviants


Suggested Collections


You Might Like…


Description
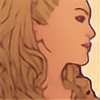
Okay, this is for the folks who are curious about my progress. Really, it hasn't changed for a long while (which I'm guessing is kinda bad), so it might be redundant for those who've seen that other walkthrough somewhere in my gallery.
So, (to quote Jessica Alba) "Let's."
1. I start with the scan from my sketchbook. I clean the pencils up in PS by adjusting the levels and going in with the eraser. I do some channeling and filling and whatnot to set up the lines for colors (I'm sure there are other tutorials somewhere for that step).
2. On a layer underneath the lines (but not the background layer) I throw on my flats with the lasso tool and paint bucket. I usually flat with a midtone. I had this dark rose toile background I wanted to use, so I chose a cool palette to go with. Originally, this toile print was the background, but it wasn't my own art so I didn't want to risk using it (though why I thought it was okay to use the pattern in my last self-portrait I don't know). Then I duplicate the flats layer and use the top one for my rendering (label them accordingly so you don't get confused).
3. After a quick background change (still using the same color scheme though), I start blocking in my highlights and shadows on my rendering layer. Since I start with a midtone, I have to choose both highlight colors and shadows. Normally, I don't have so many colors in my palette. But, for a more detailed piece like this, I think it needs it. So, I pick a color little bit lighter than the midtone and start painting in my highlights with just the default round paintbrush at 100% opacity. Then pick a color lighter than that and do some lighter highlights. And just keep building it up until you get as light as you want. Then go back to your midtone and do the whole process, but going darker for shadows. I did the lips and eyes and all that as well, but with less tones. I add a little bit of blush to my cheeks (because, y'know, a guy's gotta look his best).
4. It kinda looks like I might've skipped a few steps, but I didn't. After laying out my highlights and all, I start blending with a hard-edged round paintbrush at 5% flow. That's it. Those are really the only two brushes I use. To blend, I go around with the eyedropper (alt key) picking colors and painting where that color meets another one. I change size depending on how broad or detailed the area is. So just keep blending until it's as smooth as you like. As I blend, I kinda make new in-between colors, so I eyedrop and paint with those. I'll raise the flow % if I need a more defined edge (like in the lips).
5. Then I do some holds on a lot of the lines, most notably the bottom of the eye, the nose and lips. I don't usually do this, but it all looked way too smooth, so I duplicated my render layer and put a grain texture filter on it. I don't remember the settings though. Contrasty, I think. I don't know the numbers though. Then I reduce the fill on that layer until the texture is subtle enough for me.
And that's it.
Hope that helped some people.
I'm sure there are ways to shortcut this. Probably using less colors in step 3 or something. This is just the way I'm used to working.
PS. I'm using PS7 and a Wacom graphire if that's important info.
Image size
754x1404px 366.36 KB
© 2008 - 2024 cakes
Comments10
Join the community to add your comment. Already a deviant? Log In
Thanks, this is really helpful!!!